

Kategorien Infos / FAQ Handling on Tyros and S970/S770
Handling on Tyros and S970/S770
The more convenient way to prepare a stick for our styles with registrations:
You can download two test styles free of charge, which are prepared to such an extent that you only have to load a complete folder onto a stick according to the instructions provided. Other styles from us can then simply be sorted accordingly.
More Infos:
Tyros-User please use this Link
PSR S970 / S770 / S975/ S775-User please use this Link
Hi, musician friends and TYROS-users !
In addition to the styles, we also offer among others registration-files [RGT] as part of a style package, which of course is normally not offered by other style sellers. RGT- and style-files together should of course always run perfectly.
Because a REG-file always saves the current styles‘s location on a drive if you save it, it is important to set up your storage medium - USB-stick or hard disk - so a style can always be found by the RGT-file.
This information enables you how your USB-stick and hard drive should be prepared in a way that the files run smoothly.
In addition you will find on our Styles-24.de site two short videos, in which the individual steps are shown.
In general, we recommend setting up our software on a USB stick and running it from there because it offers a number of advantages. Just creating a backup copy of the entire USB stick is very quick and easy.
1. Instructions in short
Attention: The files in the „-Styles-24“ directory are prepared for use by a hard disk [HD] of the Tyros-Keyboards and do not run using a USB-stick. Especially, see chapter 6.
How to use the files:
- Use a backup copy of the ZIP-file
- Unzip the file
- Load the style-file data into the USB memory stick
- Connect the USB stick to the instrument
- Select the regarding registration bank of the song
- Click the first registration button of your keyboard and play.
Now the single steps.
2. Package Contents
All data of the style-file package are packed within a ZIP file. Unpack the ZIP file. If you do not already have a software program for extracting ZIP files, we recommend the free software „7-Zip“, which is downloadable free of charge. Before downloading, always check briefly what download was selected for. Always use backup copies of the files and folders, please !
Translations for the following illustration:
ZIP-kompimierter Ordner = ZIP-compressed folder
Dateiordner = Folder with files
Datei = File
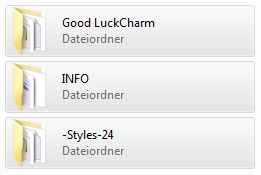
The song-title folder „Good LuckCharm“ contains all the files needed for use of an USB-stick. The INFO folder contains a Song-title.doc („Chords“), which will be described later on, and sometimes a midi-file as a spin-off product in producing the song-video. The folder -Styles-24 contains the files for the use on the hard-disk only.
Always use a backup copy !
For safety, use only a backup copy of the downloaded ZIP file unpacked into a different directory. The provided registration (RGT) files are a proposal for how to play the song from our point of view . If you want, you can change the settings, the choice of voices and effects according to your own tastes. If something goes wrong, you‘ll be able to restore the original from your style package.
Unpack the ZIP file. If you do not already have a Software program for extracting ZIP files, we recommend the free software „7-Zip“, which is downloadable free of charge.
Preparation of your „Storage Location“ (USB and Hard Drive)
When the song-related style-package is produced the registration (RGT-) file together with the style- (STY) and text- (TXT) and a midi-file (MID) are saved
- either in a song-named folder for the use of an USB-drive (directly saved after I:/ )
- or in a directory named -Styles-24 for the use of the hard-disk.
The text-file shows the text of the song and the chords and further information to run the registrations shown on your keyboard display.
If this is your first order you will need to prepare your Storage Location on your hard-disk. This means, you should create a directory named exactly -Styles-24 (in words: minus Styles minus 24). This should be created on the keyboard‘s Storage Location‘s root directory of it‘s hard-disk as
E:/-Styles-24/ . The root directory is the top level of the Storage Location‘s directory structure.
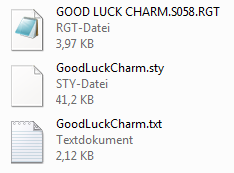
The song named files are the RGT-bank-file (Song-title.RGT), the style-file (Song-title.sty) and the text-file (Song-title.txt), if the text with chords will be shown on the instrument‘s display, and will be placed in the -Styles-24 directory. The song-related files should not be loaded into any other subfolder of the Storage Location, otherwise the style-file and the text-file will not be found by the RGT-file.
The -Style-24 -directory serves as a pool, in which all our purchased song-related style-files / text-files / midi-files are stored. The registration-files are the important focalpoint in your directory structure. We do not prefer organizing the styles by order of the song-name related styles, because once stored usally the style-files won‘t have to be handled any more. And if so, they are stored centrally in this -Style-24 -directory and it allows to find the styles alphabetically and quickly.
Optionally, you could create a different structure for all of your RGT-files. For example a directory of registrations in sub-folders ABC, DEF, GHI, etc. and song registrations could be placed centrally and easily found within this structure. A structure could be organized as follows („Datei“ = „file“):
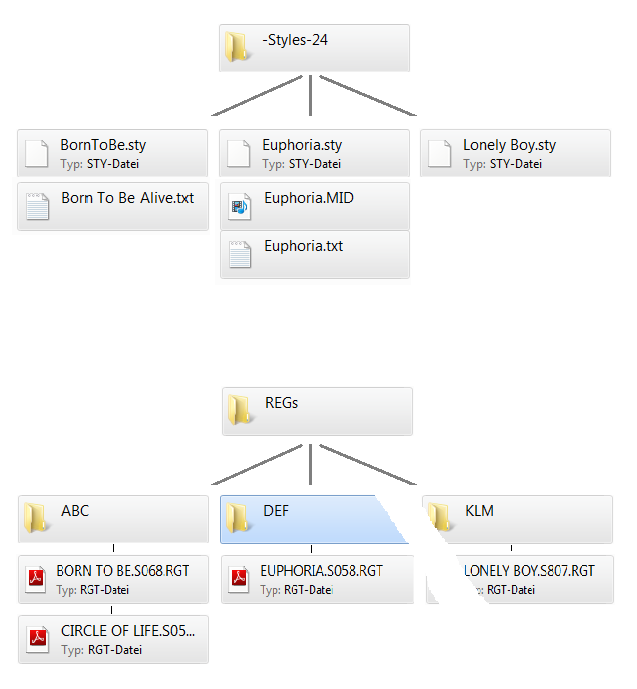
A song will be activated simply by selecting the corresponding RGT-bank-file and a click on keyboard‘s registration button 1. This registration button 1 finds automatically the corresponding style- and text-files and the MID-file too (if part of the style package) with all their settings.
The „-Style-24“-directory (folder) serves as a style pool, in which all our styles (song-related folders) can be collected. There, all Styles could be searched, found and controlled by the RGT-files. We do not prefer sorting the styles by the order of the song-related styles, because usally the style-files won‘t have to be handled any more. And if so, they are sorted centrally in this „-Styles-24“-folder and it allows finding the styles alphabetically and quickly.
4. Operating style-files from a USB-stick
If you want to use a compatible USB-stick (drive character I:/ ) with your keyboard instead of using the harddisk, this is possible, too.
The songname-related folder (here "Good Luck Charm") – see above - contains all the data needed for use of an USB-stick (Datei = File). You only have to copy this songname-related folder on this USB-stick, that’s all.
Connect the USB-stick with your keyboard. Use keyboard menu button J =(Registration) to look for the song on the connected USB-drive. Click on the registration-button #1 and the style and the text-file for your display are choosen.
Use the songname-related *.DOC-file as the guidance for use of style and registration as shown in the song-demo-video on our homepage. Or use the Text-file on your display.
5. Files provided
a) To use the this style-package effetively only the following files are necessary. All other files are for information only or include additional song- and style-related items.
1 - (Song-Title).txt
This file includes the song-text, the chords and how to use the registration-file.
2 - (Song-Title).STY
This is the actual songname-related style you bought.
3 - (Song-Title).RGT
This is a registration file and could have up to 8 programmed reg.-buttons on your keyboard. The RGT-file does not need to be placed in a fixed or special location in your directory structure. The directory paths that are part of the RGT-file, will find the style and the textfile stored on your USB-drive, regardless of where the registration file is saved.
b) Two other files complete the package and ensure an effective use of the song to be played on your keyboard:
4 - (Song-Title).MID
This file is a live recorded midi-file which is used in the video presentation of the song shown on our homepage (made for teaching purposes).
5 - (Song-Title).DOC
This file includes according to the bars the chords to be played, the song text and additional information for use of the registration and the style itself, and can be used to create a printout. For example it shows which main-variations (of the style) should be used, which reg.-buttons have to be clicked and on which bar fill-ins and endings should be used.
6. Contents of the (Song-Title).DOC (= „Chords“)
If you know the melody of the song, it is surely possible to perform the song with these chords only. The information which is provided by the *.doc- and *.txt-files, of course, are transferable to your note sheets too. The following information are included (general example):
1 - INTRO 3:
The song starts with Intro 3. To use the sync start is fine.
2 - 8 T (= 8 bars):
Song-related styles usually have a finished, even longer intro. To ensure you do not miss your start playing the melody, it is displayed how long (how many bars) the Intro runs.
3 - Left - F (Dm F Dm F Dm F Dm) (Dm=D flat or minor):
The Intro starts with an F major chord. All chords in brackets are played by the Intro not by you personally.
4 - Right - A:
The melody (right hand) starts (in this example) with Note A .
5 - Reg(-Button) 2:
This section (part) has a registration placed on the registration button 2.
6 - Main B:
Part Main - Variation 2 (Var 2) should be used.
7 - End 3:
Ending 3 should be activated at this bar. Again, note whether chord details are in brackets or whether these should be seized.
8 - +Left:
The sound (voice) for the left keyboard area can be switched on.
9 - Break:
Press the break button at this bar.
10- AA, BB, CC, DD:
These are the fill-in labels. If you are currently playing with the Main A variation, the Fill-In AA can be activated now. Normally, a fill-in should always be pressed just before the first beat of the following bar, at least if the fill-in is to run with the complete accompaniment.
If you know the melody of the song, it is surely possible to perform the song with these chords only. The information which is provided by the *.doc- and *.txt-files, of course, are transferable to your note sheets too.
The following information are included (general example):
1 - INTRO 3:
The song starts with Intro 3. To use the sync start is fine.
2 - 8 T (= 8 bars):
Song-related styles usually have a finished, even longer intro. To ensure you do not miss your start playing the melody, it is displayed how long (how many bars) the Intro runs.
3 - Left - F (Dm F Dm F Dm F Dm) (Dm=D flat or minor):
The Intro starts with an F major chord. All chords in brackets are played by the Intro not by you personally.
4 - Right – A:
The melody (right hand) starts (in this example) with Note A .
5 - Reg(-Button) 2:
This section (part) has a registration placed on the registration button 2.
6 - Main B:
Part Main - Variation 2 (Var 2) should be used.
7 - End 3:
Ending 3 should be activated at this bar. Again, note whether chord details are in brackets or whether these should be seized.
8 - +Left:
The sound (voice) for the left keyboard area can be switched on.
9 - Break:
Press the break button at this bar.
10- AA, BB, CC, DD:
These are the fill-in labels. If you are currently playing with the Main A variation, the Fill-In AA can be activated now.
Normally, a fill-in should always be pressed just before the first beat of the following bar, at least if the fill-in is to run with the complete accompaniment.
Hi, musician friends and PSR-S970-users !
In addition to the styles, we also offer among others registration-files [RGT] as part of a style package, which of course is normally not offered by other style sellers. RGT- and style-files together should of course always run perfectly.
Because a REG-file always saves the current styles‘s location on a drive if you save it, it is important to set up your storage medium - USB-stick or hard disk - so a style can always be found by the RGT-file.
This information enables you how your USB-stick and hard drive should be prepared in a way that the files run smoothly.
In addition you will find on our Styles-24.de site two short videos, in which the individual steps are shown.
1. Instructions in short
How to use the files:
- Use a backup copy of the ZIP-file
- Unzip the file
- Load the style-file data into the USB memory stick
- Connect the USB stick to the instrument
- Select the regarding registration bank of the song
- Click the first registration button of your keyboard and play.
Now the single steps in more detail.
2. Package Contents
All data of the style-file package are packed within a ZIP file. Unpack the ZIP file. If you do not already have a software program for extracting ZIP files, we recommend the software „7-Zip“, which is downloadable free of charge. Before downloading, always check briefly what download was selected for. Always use backup copies of the files and folders, please !
Example:
The file Tennesse Waltz.ZIP includes a single folder named „Tennessee Waltz“ which contains the following folder and files (sometimes without a MID-file):
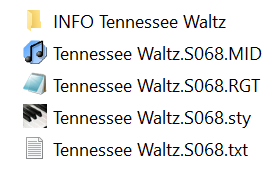
The folder INFO Tennessee Waltz contains the files:
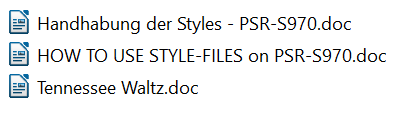
The songname-related folder (here "Tennessee Waltz") contains all the data needed for use of a USB-stick (Datei = File) only.
The INFO folder contains the above mentioned DOC-file (called „Chords“), which will be described later on.
3. Operating the provided files
When saving the RGT-file, the style-file, the text-file (needed for the keyboard‘s display) and perhaps a MID-file, they should be saved in the root directory on the USB-stick exactly named „-Styles-24“ (without paranthesis): the USB-stick has normally the drive character I:/ (= the USB-drive of the keyboard). The directory-path of the RGT-file’s location to the before mentioned files are saved in the RGT-file itself. Thus, the RGT-file will look for these files on the USB-stick of the PSR-S970/-S770.
It is essential, a folder with the accurate name „-Styles-24“ (without paranthesis) has to be created within the root directory of the USB-stick, which is the first (root) level after drive character I:/.
Again, if the spelling of the folder is incorrect, the style and other files will not be found by the RGT-file.
If this has not been done so far, you should work out a proper folder structure for the RGT-files. For example, a „RGT“-folder with sub-folders "ABC", "DEF", "GHI", etc. All songs can be searched and selected centrally in your RGT-folder structure.
All songname-related folders are saved to the „-Styles-24"-directory. If lyrics are used with your display (TXT-file) or the MID-file is needed, these files must be saved in the in this songname-related folder too. RGT-files could be saved to your specific RGT-directory structure.
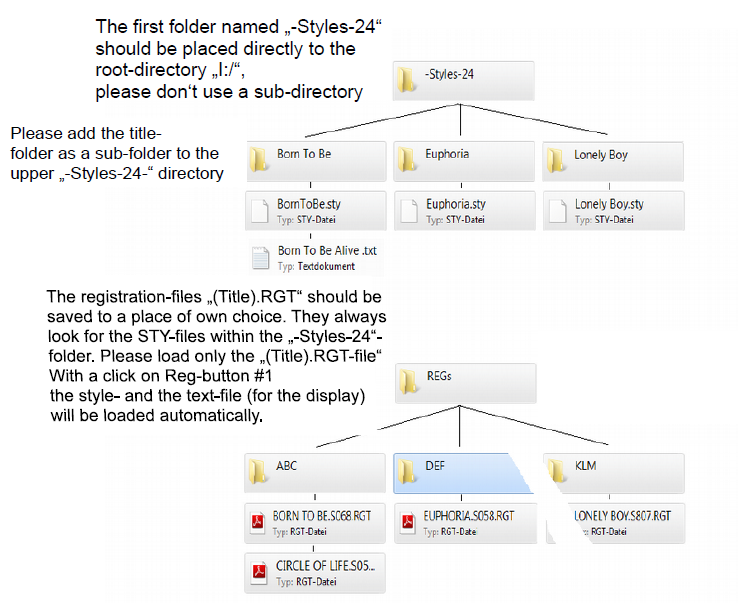
A song will be activated simply by selecting the corresponding songname-realted RGT-bank-file and a click on keyboard‘s registration button 1. This registration button 1 finds automatically the corresponding style- and text-files and the MID-file too (if part of the style package) with all their settings.
The „-Style-24“-directory serves as a pool, in which all our styles (within the song-related folders) can be collected. There, all styles could be searched, found and controlled by the RGT-files. We do not prefer sorting the styles by the order of the song-related styles, because usally the style-files won‘t have to be handled any more. And if so, they are sorted centrally in this „-Styles-24“-folder and it allows finding the styles alphabetically and quickly.
4. Files provided
a) To use the this style-package effetively only the following files are necessary. All other files are for information only or include additional song- and style-related items.
1 - (Song-Title).TXT
This file includes the song-text, the chords and how to use the registration-file.
2 - (Song-Title).STY
This is the actual songname-related style you bought.
3 - (Song-Title).RGT
This is a registration file and could have up to 8 programmed reg.-buttons on your keyboard. The RGT-file does not need to be placed in a fixed or special location in your directory structure. The directory paths that are part of the RGT-file, will find the style and the textfile stored on your USB-drive, regardless of where the registration file is saved.
b) Two other files complete the package and ensure an effective use of the song to be played on your keyboard:
4 - (Song-Title).MID
This file is a live recorded midi-file which is used in the video presentation of the song shown on our homepage (made for teaching purposes).
5 - (Song-Title).DOC
This file includes according to the bars the chords to be played, the song text and additional information for use of the registration and the style itself, and can be used to create a printout. For example it shows which main-variations (of the style) should be used, which reg.-buttons have to be clicked and on which bar fill-ins and endings should be used.
5. Contents of the (Song-Title).DOC (= „Chords“)
If you know the melody of the song, it is surely possible to perform the song with these chords only. The information which is provided by the *.doc- and *.txt-files, of course, are transferable to your note sheets too. The following information are included (general example):
1 - INTRO 3:
The song starts with Intro 3. To use the sync start is fine.
2 - 8 T (= 8 bars):
Song-related styles usually have a finished, even longer intro. To ensure you do not miss your start playing the melody, it is displayed how long (how many bars) the Intro runs.
3 - Left - F (Dm F Dm F Dm F Dm) (Dm=D flat or minor):
The Intro starts with an F major chord. All chords in brackets are played by the Intro not by you personally.
4 - Right - A:
The melody (right hand) starts (in this example) with Note A .
5 - Reg(-Button) 2:
This section (part) has a registration placed on the registration button 2.
6 - Main B:
Part Main - Variation 2 (Var 2) should be used.
7 - End 3:
Ending 3 should be activated at this bar. Again, note whether chord details are in brackets or whether these should be seized.
8 - +Left:
The sound (voice) for the left keyboard area can be switched on.
9 - Break:
Press the break button at this bar.
10- AA, BB, CC, DD:
These are the fill-in labels. If you are currently playing with the Main A variation, the Fill-In AA can be activated now. Normally, a fill-in should always be pressed just before the first beat of the following bar, at least if the fill-in is to run with the complete accompaniment.